
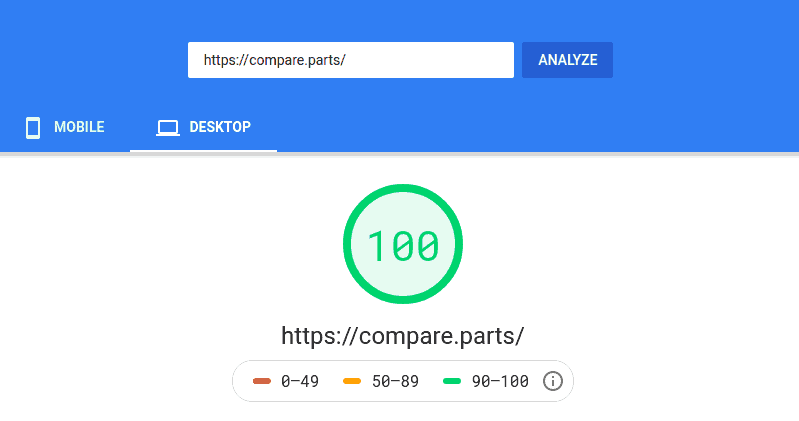
Recently I was working on a site (compare.parts) with a heavy video (hosted on Vimeo) in the above fold, hero section. It needs to be loaded fast and autoplay.
With proper optimizations, I was able to achieve 100/100 on Google PageSpeed Insights.
If YouTube or Vimeo embeds are slowing down your site, this guide is for you.
Table of Contents
Why YouTube/Vimeo Video Embeds are Slow?
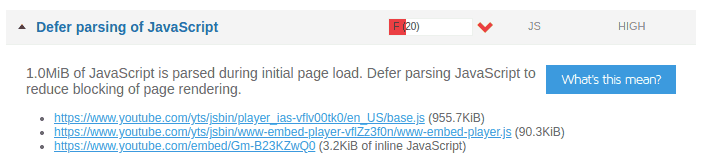
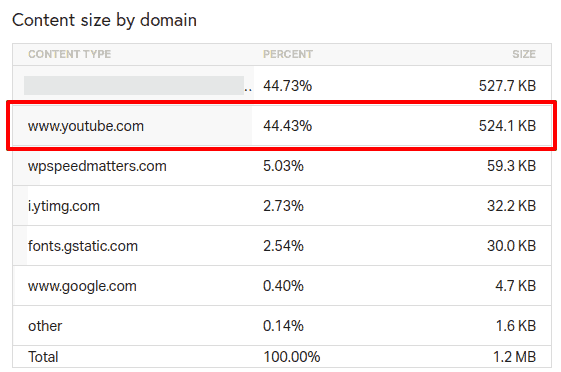
When you embed a YouTube or Vimeo video, it creates an iframe and loads several resources.
- Downloads an HTML file, one CSS, two/three (heavy) JS files which are more than 500KB
- Extra DNS lookups to www.youtube.com, i.ytimg.com etc
- Render blocking JavaScript
To better understand here are some data from Pingdom and GTmetrix after analyzing a page with YouTube (results are almost the same if you use Vimeo).

I hope that made clear these embeds are slow. Let’s see some solutions that can speed up YouTube or Vimeo video embeds in WordPress.
Solution #1: Remove Videos
Just kidding 😉
Solution #2: Lazy Load and Show Preview Image
Just like lazy load images, you can also lazy load videos. By doing so, only a placeholder image will be loaded. All the necessary scripts, iframe, video player etc will be loaded only after the user clicks on the play button.
Demo

Pros:
- Keep your videos on YouTube/Vimeo itself
- Save server bandwidth and storage costs
- Switch quality and resolution based on device and network speed
Cons:
- No autoplay
- YouTube/Vimeo branding
- Adds JavaScript for lazy loading (~10KB)
How to Lazy Load Youtube/Vimeo Videos in WordPress
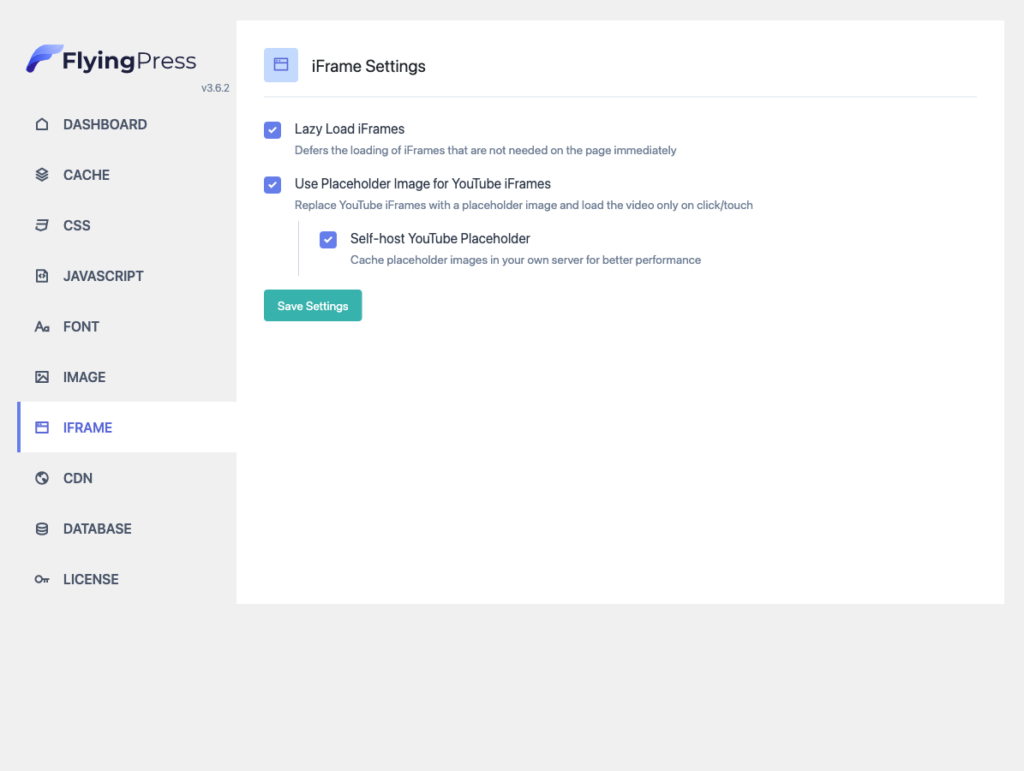
If you’re using FlyingPress go to iFrame settings and turn on “Lazy load iFrames” and “Use Placeholder image for YouTube iFrames”.
- Lazy Load by WP Rocket – Lazy load images, iframes and YouTube videos, less than 10KB
- WP YouTube Lyte – Developed by the same guys behind Autoptimize
- Lazy Load for Videos – Lazy load both Vimeo and YouTube
Solution #3: Self Host Videos
Uploading videos to YouTube is ideal if you’ve many videos in a post/page and you already have a YouTube channel and you want to grow that together.
However, if you’re using videos just for the hero section or above the fold content, then the above solution might not be the best. Directly embedding YouTube/Vimeo will make it slow too. In such a case, you can self-host videos and embed them.
By self-hosting, you can also remove the fear of “will YouTube/Vimeo delete my video in future?”.
Demo
Pros:
- Autoplay
- No single line of JavaScript or CSS needed
- Full control over video, fully customizable
- Ideal for background videos
- No branding
Cons:
- Need a CDN
- Storage space for videos, either in server or CDN storage (push zone)
- Same video file delivered for mobile and desktop, fast and slow networks
How to “Properly” Self Host Videos in WordPress
You’ve may have already heard that self-hosting videos is a bad idea and you should never do it. But I would say, if you “properly” do it, there is nothing wrong it.
Step 1: Compress Video
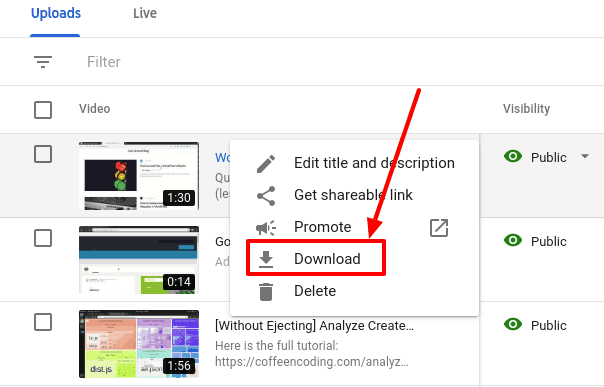
There are many online and offline compressors available that can compress videos. But what I would suggest is to upload the video to YouTube and download it back. You’ll get the best-compressed video!
Step 2: Upload Video & Serve from CDN
You can upload the video files directly to ‘Media’ and enable CDN. But what I would suggest is to upload videos to a CDN that have push zone (storage). Thus you save server disk usage, save server bandwidth and will be easy in future to migrate the site to another host/server.
Push Zone: A Push Zone is a zone where the user uploads (“push”) files directly, as you would with a regular hosting account, later connected to a pull zone. Ideal for large files (>10MB)
There are many CDN providers which provide a push zone. My favourite one is BunnyCDN. It has storage and edge servers designed for video delivery. It’s very reliable and cheap.
Goto BunnyCDN and create an account. Add a new storage zone and upload your videos.


Once uploading is complete, grab the URL of the video (you’ll need to connect it to a pull zone).

Step 3: Embed Video in WordPress
Embedding the video is pretty easy. Add a ‘Custom HTML’ block and add the following snippet.
Replace VIDEO_URL with yours and you’re good to go.
By default, the placeholder image will be the first frame in the video. If you want you can place a custom image.
This is the native video player in the browser. No external JavaScript or CSS is downloaded for this. The video tag is highly customizable. You can find more options in it here.
Bonus Tip
If none of the solutions works for you, at least preconnect to the YouTube or Vimeo domains. By doing this you tell the browser: “hey, I’ll need to make TCP connection and SSL handshake to these domains very soon, so do them now”. You could save 200-300ms which browsers spend for connecting to domains.
Paste the following code the head tag:
For YouTube:
For Vimeo:
Conclusion
One solution won’t fit for all. Each has its own pros and cons. Go with the one that works for you. If you’re self-hosting, make sure you enable a CDN especially if you upload videos directly to ‘Media’, it’s a must!
Comment below if you’ve any queries or feedback. I read and reply to each of them within 8 hours!


Comments are closed.