If you’ve analyzed your site via Google PageSpeed Insights, you must have probably seen the error “serve images in next-gen formats”. Well, WebP is that next-generation format.

However, delivering images WebP isn’t that easy. It depends on your server web server, cdn of choice, theme, cache plugins etc.
This guide helps you to deliver images as WebP in WordPress in 3 methods.
Table of Contents
What is WebP?
A new image format for the Web
Google
WebP is an image format (just like png and jpg), developed by Google. Images in WebP format (.webp) are generally much smaller, which makes websites faster and use less bandwidth.
Depending on the image, you may get a reduction of 25% to 70% in size.
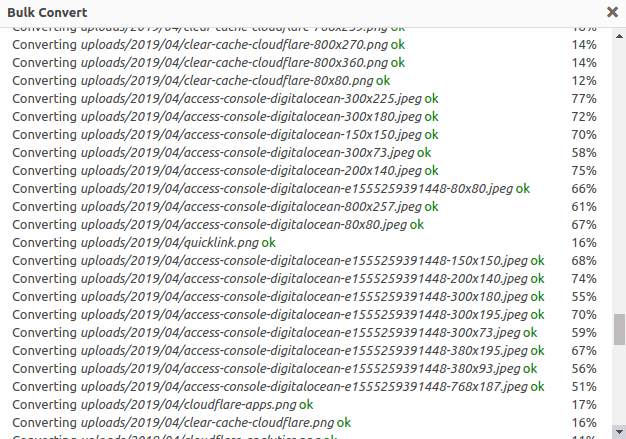
JPEG, PNG, GIF etc have their own pros and cons. The table below will give you an idea:
| JPG | GIF | PNG | SVG | |
| Vector | ❌ | ❌ | ❌ | ✅ |
| Raster | ✅ | ✅ | ✅ | ❌ |
| Transparency | ❌ | ✅ | ✅ | ✅ |
| Animation | ❌ | ✅ | ✅ | ✅ |
| Lossy | ✅ | ❌ | ❌ | ❌ |
WebP comes with almost all the features mentioned above! Then why can’t we use WebP everywhere?
Why not use WebP everywhere?
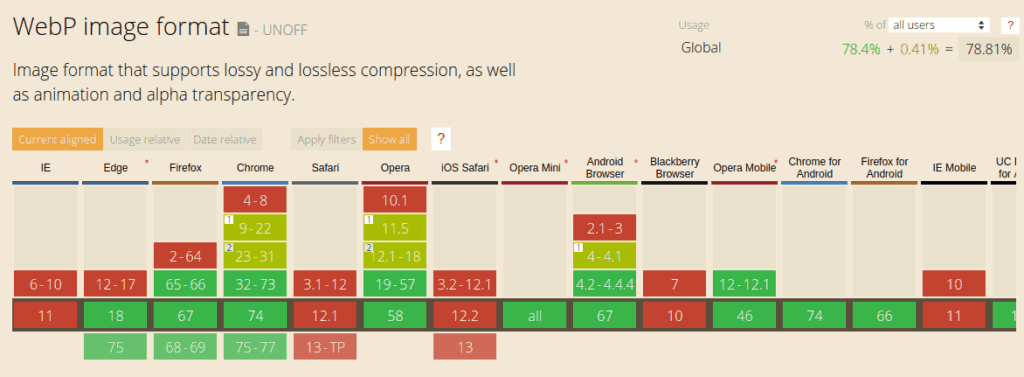
As you can see only 80% of the devices only supports WebP. Not just outdated browsers, Safari/iOS Safari still doesn’t support WebP.
Why serving WebP is hard?
As you’ve noticed we’ve to deliver images according to the browser. If the browser doesn’t support WebP, we’ve to serve them the original image (jpg/png/gif).
There are mainly two ways to serve WebP:
Using picture tag
We can use picture tag to tell the browser that we do have WebP format. If the browser supports it, it will be fetched otherwise normal/fallback image.
<picture>
  <source srcset="img.webp" type="image/webp">
  <source srcset="img.jpg" type="image/jpeg">
  <img src="img.jpg">
</picture>
By varied response
In varied responses, you have a single file as usual. Just like this:
<img src="img.jpg" />The single image URL is capable of delivering jpg and webp. It’s done by the server.
Even though its file extension is ‘.jpg’, if the browser support WebP, then its response will be WebP. Also called ‘varied response’.
Picture tag vs Varied response
Each has its own pros and cons. Here is a comparison table:
| Picture tag | Varied response | |
|---|---|---|
| Works with background images | ❌ | ✅ |
| CDN friendly | ✅ | ✅ (only a few) |
| Need to configure the server | ❌ | ✅ (Nginx) |
| Works with lazy loading | ✅ | ✅ |
How to Serve Images in WebP in WordPress?
Method #1 – Use CDN with only the fly WebP conversion
This is probably the easiest solution. Some CDN providers nowadays support converting images to WebP on the fly, along with image optimization.
Here are a few:
- FlyingProxy (recommended)
- FlyingCDN addon from FlyingPress (recommended)
- BunnyCDN
- Cloudflare with Polish (Pro plan)
- Cloudinary
- ShortPixel Adaptive Images (uses StackPath CDN)
- WP Compress
You can also save some disk space using this method since you don’t need to store both normal and converted WebP images.
BunnyCDN
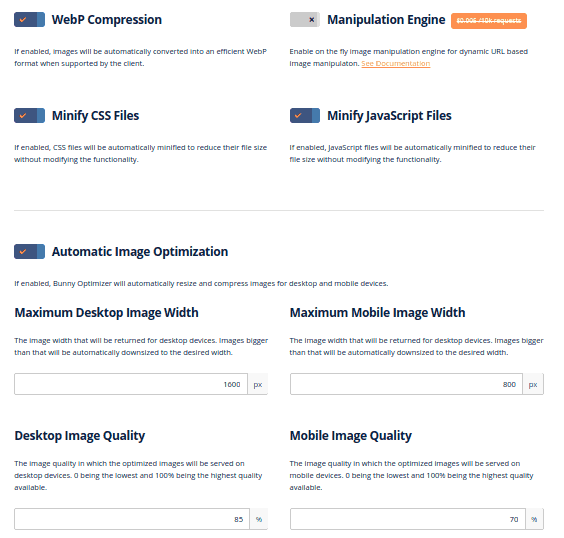
BunnyCDN comes with ‘Bunny Optimizer’ which can compress images and convert them to WebP on the fly.
Method #2 – Using varied response + CDN
As described above ‘varied response’ will have a single image URL that is capable of serving both WebP and non-webp images based on the requested browser.
We also need to pick the right CDN that supports WebP request headers as a cache key. Otherwise once the WebP image is cached in the server, the same will be delivered to browsers that don’t support WebP.
Setup varied response in WordPress
The easiest way to set up the varied response for WebP in WordPress is via WebP Express plugin. Just install the plugin and click ‘Save settings and force new .htaccess rules’.
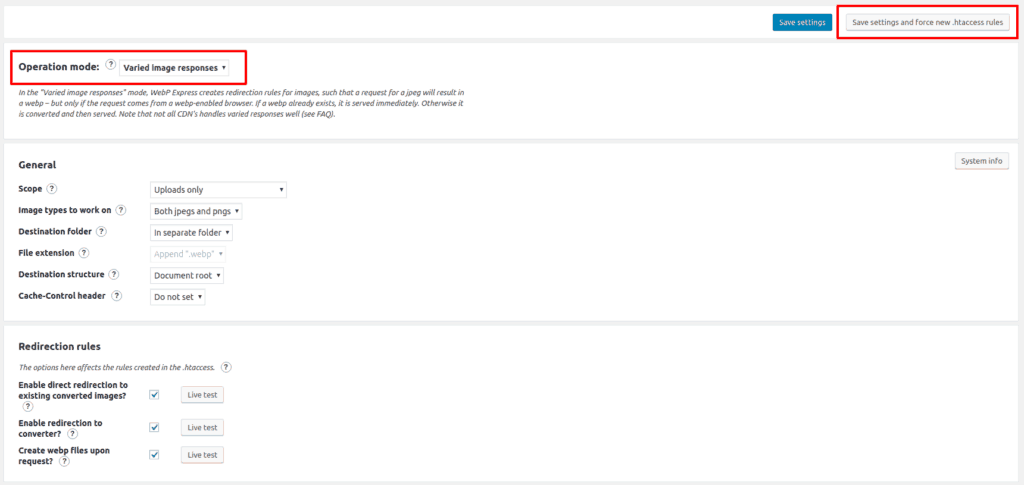
WebP Express will set up a WebP converter and rewrite rules so that on receiving the request it will convert images to WebP on the fly and if the browser doesn’t support WebP, the default image will be delivered.
If you’re in Nginx
WebP Express adds necessary ‘.htaccess’ rewrite rules, but it only works in Apache or LiteSpeed or OpenLiteSpeed server. If you’re in Nginx, you’ll need to edit nginx.config and add the following code:
# WebP Express rules
# --------------------
location ~* ^/?wp-content/.*\.(png|jpe?g)$ {
  add_header Vary Accept;
  expires 365d;
  if ($http_accept !~* "webp"){
    break;
  }
  try_files
    /wp-content/webp-express/webp-images/doc-root/$uri.webp
    $uri.webp
    /wp-content/plugins/webp-express/wod/webp-on-demand.php?xsource=x$request_filename&wp-content=wp-content
    ;
}

# Route requests for non-existing webps to the converter
location ~* ^/?wp-content/.*\.(png|jpe?g)\.webp$ {
    try_files
      $uri
      /wp-content/plugins/webp-express/wod/webp-realizer.php?wp-content=wp-content
      ;
}
# ------------------- (WebP Express rules ends here)
The above code adds necessary response headers (vary and cache-control) and try to deliver WebP if exists, otherwise, forward it to converter (based on the browser support)
CDN providers that support ‘Varied response’
If your CDN provider doesn’t support WebP as a cache key, then WebP files will be delivered to non-webp supported browsers. Similarly, there are also chances that non-webp images will be delivered to supported browsers.
BunnyCDN, KeyCDN, Google CDN and many other CDN providers support WebP as a cache key. Make sure you enable them in settings.
In BunnyCDN:

In KeyCDN:

Using Cloudflare free plan?
Unfortunately, Cloudflare free plan doesn’t support WebP as a cache key. Either use a CDN like BunnyCDN or upgrade to their pro plan.
Setup varied response + CDN in popular hosting providers
Make sure WebP Express is installed.
- Kinsta or WP Engine – Contact their support to add the above Nginx config and enable cache WebP cache key in their CDN (KeyCDN).
- Cloudways – Installing WebP Express and saving settings with ‘.htacess’ is enough. Since Cloudways uses a hybrid approach of Apache + Nginx, it works out of the box.
- SiteGround – Contact support to add Nginx config. Use a supported CDN as mentioned above.
- LiteSpeed/OpenLiteSpeed/Apache server – Installing WebP Express and saving settings with ‘.htacess’ is enough. Also, use a supported CDN as mentioned above.
- Custom VPS with Nginx (LEMP stack) – Configure
nginx.confand use a supported CDN as mentioned above.
Method #3 – Using picture tag
If both of the above methods don’t work for you, you can use the picture tag. It doesn’t require any server configuration (editing nginx.conf) and it supports all CDN providers.
If you use this method, all img tags will be converted to something like this:
<picture>
  <source srcset="img.webp" type="image/webp">
  <source srcset="img.jpg" type="image/jpeg">
  <img src="img.jpg">
</picture>
If the browser supports WebP, the corresponding file is delivered, otherwise normal image.
Setup picture tag for WebP in WordPress
The easiest way to set up a picture tag is via WebP Express.
Set the operation mode to ‘CDN friendly’ and turn on ‘Alter HTML’

Conclusion
I wish there will be a day where all browsers support WebP!
If you can spend a few dollars a month, then the easiest and efficient way is to use a CDN like FlyingCDN that will convert images to WebP on the fly. Otherwise, stick with method #2 I mentioned above.
Comment below if you’ve any queries or feedback. I read and reply to each of them within 8 hours!


Comments are closed.